Step 1 – Aligning Platen With Rear Platen Casting
Q. Roller Or Platen Problem?
Presses need adjusting for perfect inking. If you’ve tried to ink and some parts of your type or plate put ink on the paper and others don’t then, either your rollers need adjusting or your “rear platen casting” needs aligning. If you can see ink on your type then it’s alignment that’s the issue – if you can see ink on some of your type or plate but not all then it’s a roller issue so please visit the roller forum. This article is aimed at full size platen presses similar to the Arab, Cropper, Furnival etc.
Platen Alignment – Time allowed for this process should be around two hours.
Getting Started
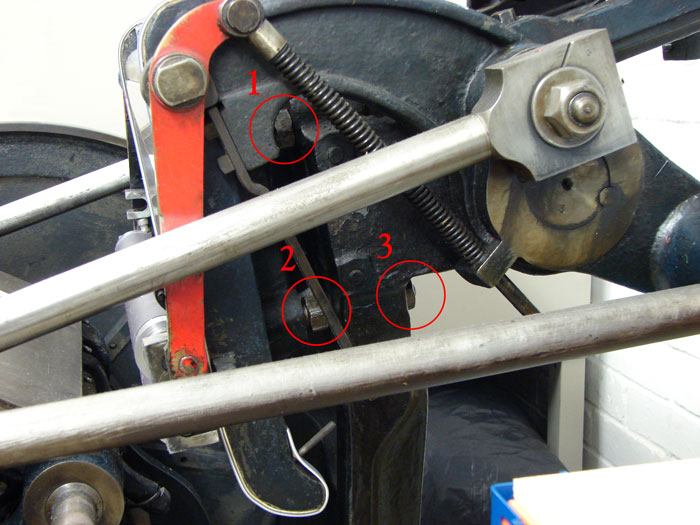
At the rear of the press there will be four large nuts that line up with the corners of the chase area, these are connected to the studs of the rear casting. You will adjust these after a test impression. See image.
Description
Item 1 – Casting Stud
Item 2 – Casting Stud
Item 3 – Casting Stud Nut
Test Impression
- Lock up four large characters of type, preferably the same characters (so four uppercase A’s for example) in a standard serif (nothing fancy), wood type is fine but use the same point size, one piece in each corner of the chase. You can use polymer too, cut up a plate into four pieces about 1.5 inches square and put one in each corner of your Chase Base ensuring the base is central in your chase.
- Place a large sheet of paper over the entire platen area OR four separate pieces one in each corner and fix. Ink the press then set your impression adjustment to its lightest setting and pull an impression onto the sheet.
Examination
Look at your sample and see if there is an impression on the sheet. If there is no ink visible increase the adjustment on your impression lever until a light impression appears. Once ink begins to appear on the paper you need to find the heaviest area of impression – this will be your ‘guide corner’.
- If your impression is light in one corner only you will need to adjust your Platen Casting by bringing that corner forward.
- If your impression is light down one side e.g. top and bottom corners on the same side then you need to adjust your type bed by bringing the top and bottom corners on that side forward.
- Wherever the impression is too light you will have to adjust the rear casting.
Adjust The Rear Platen Casting
To adjust the type bed work on one corner at a time. Pick the corner diagonally opposite to the one you selected as the strongest impression.
- Release the nut at the back of that stud (they will likely be very stiff)
- At the base of that stud there will be a hex shaped area (similar to the nut) which you can now adjust with a spanner. Turning it one way will push the type bed forward, the other will take it back. Turning it clockwise should push it forward (but this does vary on different presses), so do this about a quarter turn then tighten the nut at the rear of the stud again.
- Pull another impression.
Examination
Look at your impression and see if there is any improvement on the stud you’ve adjusted.
- If not adjust again. If there is, check if it looks equal to your ‘guide corner’.
- If it is lighter continue to adjust forward, if it looks heavier then adjust back the other way (if adjusting backwards at any time you will need a new sheet of paper to measure your adjustments).
- Once happy they are pretty close you should move on to another corner repeating the adjustment process until it matches the other two. Adjusting the third corner may alter the appearance slightly, of the two you’ve already done – don’t tackle this yet.
- Now do the fourth corner.
- Once all corners look fairly equal you should lighten the impression slightly using the adjuster on your impression lever. Keep taking off impression value until one of the corners disappears, then adjust that corner forward to bring it back.
- If you lighten the impression value and two or three corners disappear then you will need to adjust them all the same.
- If all four corners disappear, increase the impression slightly on your lever and pull another impression. If all four reappear and look the same then you have successfully aligned your platen and rear casting.
- Final Step >> when happy all corners are equal, alter your impression lever adjustment to its lightest setting. Pull an impression on new paper. Is an impression visible? If not increase the impression slightly. When an impression becomes visible check the adjustment on your impression lever. It should be about a quarter of the way in so that you have a little room to decrease impression but still at least three quarters of the adjustment remaining to increase the impression so you can do heavy impression work.
- If the setting is more than a quarter of the way in you need bring the whole type bed forward equally on all the studs repeating the above method. Check the impression again and once you have everything equal and plenty of adjustment on your impression lever you are done.
- Make sure all the rear casting nuts are locked off properly.
Conclusion
Your next area of concern would be to check your inking and see if the ink rollers need adjusting which is a similar process except you will add tape to your roller rails to adjust the rollers. They will probably not be equal so don’t expect them to be.
Step 2 – MOT your Press
A quick list of things to check before you get going – avoid disasters! This particularly applies to anyone who has disassembled and reassembled a press themselves for any reason. Some of the items in this list however are simply good press practice.
- Many platen presses have a backward motion as the rear frame moves outward from the press on the drive arms or “connecting rods”. Check the press can fully cycle without hitting anything, if situated near a wall make sure it is far enough away not to strike the wall in operation. Ensure if the press is situated in an open work area that anybody else in the vicinity understands how the press works so they don’t walk too close to the press when running, particularly if a motor and drive belt has been fitted.
- The first thing to do whenever you print is to always check the platen is not going to crash into anything when it closes. Check for lay equipment and friskets in the platen area or lead or anything you are using to position your job including gauge pins. Make sure that your impression is set to minimum until you’ve pulled a test impression. Check nothing will damage your chase base if you’re using one or your type.
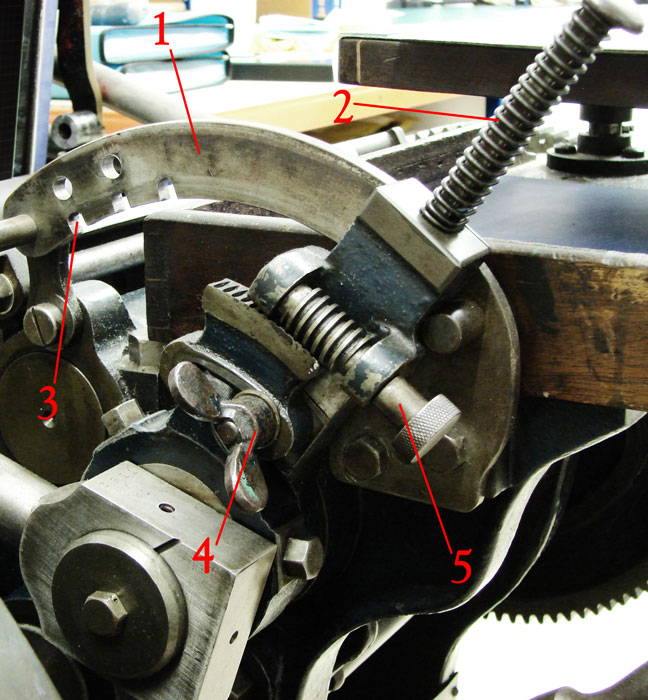
- On older presses like the Arab or Cropper etc there is usually a “governor rail” or “Impression Spring” which contains the action of your impression lever. This device keeps the lever in place and sets the correct position of the platen during impression, you should check this for cracking. If the spring is damaged it may not hold and your inking will be blurred, you can also damage type, plates and your press. A Precision engineer will easily make a new one for a reasonable cost and the spring is relatively simple to remove and replace, remove the original and give it to the engineer for a template. See image.Description
Item 1 – Impression Spring
Item 2 – Impression Lever or Throw off Lever
Item 3 – Impression Lever Holding Colar
Item 4 – Impression Adjustment Lock
Item 5 – Impression Adjustment
- Older presses (non electric or treadle presses) have a flywheel which takes the energy from the treadle and applies it with momentum to the operation of the press. Check the wheel is properly secured and runs smoothly – particularly if you have dismantled the press and reassembled yourself.
- If running for the very first time, run the press manually very slowly through a full cycle to make sure all parts are working smoothly, listen for any grinding or any sense of something not moving smoothly. If this happens, stop at once and try to locate the problem. Contacts us for advice.
- Do make sure your press is well oiled before you start printing. Most platen presses have gravity oilers and oil constantly exudes from the moving parts and your press can soon run dry. You should start by oiling your machine every day before you commence printing.
- If you have a treadle press check the treadle assembly to make sure there is no cracking. These machines are mostly cast iron and brittle – that means they are prone to cracking if parts are dropped. The treadle is a common part to crack. If yours is cracked it will need to be welded (a job for a professional as cast iron can be tricky!!) to prevent a complete break. Sometimes a plate can be added above and below the treadle and welded for a strong and lasting fix.
- Make sure your break or clutch lever (depending on the age of your press) works properly to stop the press. If you are using your press in a working environment and you have employees you may need to take steps to meet current health and safety requirements including closing the spokes of your flywheel off (cover with a sheet material e.g. thin plywood), having fences fitted that cut off the press automatically etc. Check with your local Council.
Step 3 – Think Ink
You should be ready to start thinking about inking up. Here’s a list of things you’ll need to consider but these subjects are covered in depth in their proper forums – so do check there.
- Roller Condition
Rollers need to be an exact match in diameter and preferably material too. Check them with a decent micrometer or callipers and makes sure the rollers match the truck diameter. If the rollers are a little bigger than the trucks you can pack your ink rails to raise the roller height to compensate but not if the rollers are different sizes.
If your rollers don’t match each other in diameter you’ll need your rollers recovered. If your rollers vary in diameter across their length – you need your rollers recovered. If your rollers have dents, scores, scuffs, cuts, flat spots or holes you will need your rollers recovered. All these issues will produce problems when inking.
- Roller Height
Roller height is crucial and must be accurate as any impression into the paper surface will reveal ink on the shoulder of the plate producing unclear print if the rollers are too tight. If the rollers are too loose or too high then you may get “roller skid” smearing your ink or you may simply not get ink onto the paper.
- Truck Condition
Again if your trucks are uneven you will get uneven ink and if they are damaged or have flat spots it will affect your ink. You will need new trucks in this case.
- A Clean Press
- Sounds rudimentary but do make sure your type bed (rear platen casting) is clean so your base (or type) sits flat in the chase. Make sure your platen is also clean, always remove ink from your press and don’t let it dry. If it does, an ink scraper, wire wool and press wash are the answer – a clean press produces clean work. Anything on the platen will guaranteed show in your work if it sits under your impression area. This extends to other equipment, the glass on which you knock up your ink and scales if you weigh your ink.
- Clean Paper
- Something often overlooked, fan out your paper carefully and flick through the sheets from both ends of your stack. This is good practice for separating your sheets for trouble free feeding into the press but it also allows you to look for debris and stray fibers but also the dreaded ‘guilly stick’. Guillotines have a hardwood cutting stick which the blade cuts into to preserve the edge. Chips from this get into the paper when cutting and can spoil your ink if transferred to the press while inking.
Probably seems a lot to think about if you’re new to this craft but don’t worry you’ll be doing it in your sleep before long – no really, you will actually be pulling impressions in bed…